Bone Broth – in the Instant Pot and Slow Cooker

Disclosure: this post contains some affiliate links and I may be compensated, but all opinions are my own. This compensation helps with expenses to keep this blog up and running! Thank you for all your support!


I wanted to share this recipe two different ways in case you don’t have an Instant Pot! But, like, what, why don’t you have one?! They have completely revolutionized how I cook and are SO AWESOME.

Maybe you’re just old school and really like the slow cooker? Either way the broth will taste awesome.

Want to know the secret to a really awesome broth?? Like, the salty comforting heals your body in a sip type of broth? The key is to leave the vegetables out of the cooking process until right at the very end!

Leaving out the vegetables ensures that the broth doesn’t get a bitter taste from extremely over cooked veggies. Think about it, if you cook a vegetable for up to 24 hours it breaks down SO MUCH and leaves a bitter taste behind.

I love either not adding vegetables at all or just adding them in the last hour of cooking. I learned this trick from the Sarah Ballantyne and Stacie Toth on their podcast episode all about broth!! Give it a listen here.

Another tip I love is to make sure the broth can cool down rather rapidly after cooking to ensure that you get the most gelling possible! The more gel-like the consistency the more collagen the broth has! And let’s be honest – we do it for the collagen 🙌🏼

Need more convincing on the health benefits of broth/collagen? I have a whole post on the benefits and why collagen is a trend that’s here to stay. Give it a read here. Long story short: collagen is extremely beneficial for hair, skin, nails and gut health! And it also adds protein and gives us building blocks for repairing the body.

Bone Broth – Instant Pot and Slow Cooker

(PALEO, WHOLE30, 21DSD, GRAIN FREE, GLUTEN-FREE, DAIRY-FREE)
SERVES 8
PREP TIME: 15 MINUTES            COOK TIME: 2 HOURS -24 HOURS

Ingredients:

2 lbs. bones – I love chicken bones or beef soup bones, honestly any combination will do

8 c. filtered water

1 tsp. sea salt

1 tbs. apple cider vinegar

2 carrots

2 celery ribs

Half an onion, peeled and roughly cut

Instant Pot Method:

  1. Start by placing the bones into the Instant Pot and cover with the 8 cups of filtered water.
  2. Add in the sea salt and apple cider vinegar.
  3. Select “pressure cook” on the Instant Pot and set timer to 120 minutes.
  4. After cooking cycle, manually release pressure.
  5. If you wish to add veggies do so now and set Instant Pot timer back to 30 minutes.
  6. Again, release pressure manually after the cycle has completed and use a strainer to separate the broth from the bones and veggies into a large bowl.
  7. Place bowl in freezer for at least 30 minutes but make sure you don’t let it freeze. We want to cool the broth rapidly but not freeze it.
  8. Store in fridge after it has cooled and once completely cool you will see fat rise to the top. Perfectly normal!
  9. Skim the fat off with either a spoon or this cool little utensil.
  10. Store in refrigerator for up to a week or in the freezer for up to 3 months.

Slow Cooker Method:

  1. Place bones, water, sea salt and apple cider vinegar into the slow cooker.
  2. Set to low and let cook for at least 24 hour, up to 36 hours.
  3. You can add the vegetables in the last 2 or so hours of cooking if you’d like.
  1. After the broth is done in the slow cooker, use a strainer to separate the broth from the bones and veggies into a large bowl.
  2. Place bowl in freezer for at least 30 minutes but make sure you don’t let it freeze. We want to cool the broth rapidly but not freeze it.
  3. Store in fridge after it has cooled and once completely cool you will see fat rise to the top. Perfectly normal!
  4. Skim the fat off with either a spoon or this cool little utensil.
  5. Store in refrigerator for up to a week or in the freezer for up to 3 months.

Sign up for my monthly newsletter! I share even more nutrition advice, recipes you won’t find on the website and special discounts.

Air Fryer Drummies – 2 Ways (Paleo)

Disclosure: Please keep in mind that some of the links in this post are affiliate links, meaning if you go through the links to purchase an item, I will earn a commission. Keep in mind that I link these companies and their products because of their quality and I will never recommend a product if I don’t fully love it or use it myself!

Okay question time: can I call drumsticks drummies? I feel like it is way cuter and more endearing that way. And super original. So I’m going to go with it.

These little beauties are almost too simple. I have been without an oven for almost two month now (gasp!) and have been exclusively using either my cast iron pan, Instant Pot or Air Fryer. While I do have amazing tools at my disposal, it has been a bit of a shock to be without an oven for so long! I have adapted though and will prevail!

I decided to experiment with some different sauces and I have to say I am amazed at how freakin’ easy it is to make good tasting food with these sauces. Like blown away. So dang simple.

I marinated the drummies overnight and cooked them right before dinner and had perfectly crispy drumsticks in under 25 minutes! Much faster than the oven and crispier 😏

For the first set of drummies I chose a buffalo hot wing style courtesy of all the football and hot wings I have been seeing lately! Since hot sauce tastes so dang good on wings I wanted to try it on drumsticks! Turns out it’s just as good if not better because you get so much more meat on a drumstick! YUM. I talked about the Tessemae’s dressing I used last week in this post. Obsessed doesn’t even begin to cover it.

Second, I used a Lemon Garlic dressing also from Tessemae’s and I was very pleasantly surprised at how tender and moist the drummies stayed inside while still crisping up nicely on the outside. While I love me some Lemon Garlic dressing I’m pretty sure the drumsticks would also taste good with the Honey Mustard dressing or the any of the Ranch flavors. Mmm.

I hope you love these as much as I do! Team drummies for life ❤️

Crispy Air Fryer Drumsticks – 2 Ways (Paleo)

(PALEO, GLUTEN-FREE, DAIRY-FREE, REFINED SUGAR-FREE)
SERVES 2
PREP TIME: 10 MINUTES            COOK TIME: 20 MINUTES

Ingredients:

1-2 lbs. chicken drumsticks

¼ – ½ c. sauce of your choice – either Tessemaes Buffalo Hot Sauce or Tessemae’s Lemon Garlic Dressing

⅛ tsp. sea salt

Juice of one lemon

Method:

  1. Pour dressing of choice over wings in a bowl and mix to coat fully.
  2. Store in fridge and marinate at least one hour or up to 24 hours.
  3. Place in air fryer and set to 375 degrees for 20 minutes, flipping once half way through at 10 minutes.
  4. When finished, sprinkle with sea salt and a splash of lemon juice and more sauce if desired. Enjoy!

Sign up for my monthly newsletter! I give tips, information and recipes you won’t find anywhere else! 

Monday Musings 1.14.19 + Keto Chicken Tenders Recipe from Keto Quick Start

Disclosure: Please keep in mind that some of the links in this post are affiliate links, meaning if you go through the links to purchase an item, I will earn a commission. Keep in mind that I link these companies and their products because of their quality and I will never recommend a product if I don’t fully love it or use it myself!

Is it Monday again already?! Whoa, that happened fast! I feel like all my days are blurring into one lately because the fiance and I have been working every day for the last 2 weeks on this remodel and likely will work every day for the next two weeks until we leave! Physical labor jobs are no joke.

This week I have been really into anything that either helps shorten the duration of a cold, helps reduce inflammation or just makes me feel really good in general!

#1 Gaia Golden Milk

This turmeric powder with dates and other herbs is AWESOME. I love this powder because now I can make my own fancy turmeric milk lattes at home and they won’t be $6 for a teeny cup! Brilliant.

I have been loving the frothy latte as a pre-bed treat! It has ashwaghanda in it to help relax and calm the body down. I love the feeling of ashwaghanda because I can feel it relaxing me! While I don’t have a huge noticeable difference right away, I am pretty sure the effects will start to show in reduced inflammation and better mobility.

In the meantime, if you need me, I’ll be trying to get the turmeric stains out of my clothing because #messy.

 #2 Vive Organics Immunity Boost

I am pretty sure these are helping waaaay more than they actually are because the ginger flavor is so strong. My brain is like “it just has to be working if there’s that much ginger in there!” So I’m going with it.

I have been sick for over a week now and kind of feel like I am finally getting over it. Hopefully I won’t jinx myself with that one. Ain’t nobody got time to be sick. These little wellness shots have been giving me life though! I have been taking one just about every day to try and kick the sickness. I think for full effect, they should probably be taken when you think you are getting sick, not when you are already sick like I have been doing – ha!

I have been getting both the Immunity Boost and Wellness Rescue flavors and love them both! The Immunity Boost has ginger root juice, turmeric, echinachea and black pepper while the Wellness Rescue has oil of oregano, elderberry, ginger root juice and cayenne pepper. They both certainly have a kick!

Oil of oregano and elderberry have both been shown to reduce the duration of a cold so I am all about that life right now. While I typically have oil of oregano in my supplement arsenal, I have been without my home apothecary for 6 weeks now. These little juice shots are certainly filling the void though. Though they are strong tasting, there is some pineapple or pomegranate juice added to help soften the flavors and it is actually a quite pleasant little sip!

Highly recommended if you can find them in your area and feel a cold coming on or are already sick!

#3 Trader Joe’s Cauliflower Gnocchi

Okay, okay, I hopped on the train! I just couldn’t hold off any longer and I went and got some of the cauliflower gnocchi that I’ve been hearing so much about. Located in the freezer section at Trader Joe’s, the cauliflower gnocchi is gluten free and vegan! The ingredients are super clean and I was surprised to see just how clean they are!

Containing only cauliflower, potato starch, cassava flour, olive oil and salt these little babies are little pillows of heaven. One caveat though – do not, under any circumstances, follow the cooking directions on the back of the bag! They will wind up soggy and doughy 100% of the time and you will be sad. Instead, I have either been defrosting them in the fridge for about a day beforehand and then pan frying in my skillet to get them crispy or using my beloved air fryer for a truly decadent crunch.

I have been loving them under some easy red pasta sauce (favorite brand here) with some ground beef or just by themselves as part of a meal! Here is another recipe that I can’t wait to try out!

#4 Kale Microgreens

I am so into microgreens right now! Gimme all the nutrients, please! Microgreens are similar to sprouts in nutritional value, but microgreens grow in soil whereas sprouts are grown by a water and soaking process.

I found the kale microgreens at a Whole Foods in Minneapolis and am so glad I snagged them! They are crunchy, bright and fresh! I love having them in my salads (aka THIS SALAD that I’m still eating!).

Full of Vitamin C (which we could all use a little bit more of this time of year TBH) and polyphenols, these little microgreens contain 4-40x more nutrients than their mature counterparts! WHOA! Talk about nutrient density. I’ve really been enjoying experimenting adding different veggies into my diet. Check to see if you can find any microgreens at your local grocery store next time you’re in!!

#5 Keto Chicken Tenders

YUM!! I didn’t know anything could taste so good. Diane Sanfilippo is a culinary genius. Not sure why I have never thought to bread chicken with coconut flakes before but I am hooked now! The finished product doesn’t taste like coconut at all and is very satisfying. I especially loved them dipped in mustard (insert heart eyes emoji here).

Diane’s newest book Keto Quick Start is available now and is such an awesome resource for anyone looking for sound and balanced information about the keto diet. I have really loved being able to read through this book and learn the benefits of the keto diet and how to approach it in a healthy way. While I don’t eat keto 100% of the time I certainly do love to experiment with different meals and macro breakdowns!

If you haven’t checked out Diane’s work yet, head here to check her out! I absolutely love her podcast Balanced Bites and own all of her books 🙂 I was super honored to be part of the launch team for Keto Quick Start to help promote her work and am (as always) super impressed with the level of detail and level headed advice the book contains. With Diane’s permission, I am able to share the recipe for these amazing Keto Chicken Tenders!! You can also find the recipe on page 206 of Keto Quick Start. Enjoy!!

Keto Chicken Tenders from Keto Quick Start by Diane Sanfilippo

db489627-7546-4a58-a881-abfc3deea98e.jpg

SERVES 6 (4 per serving)
PREP TIME: 15 MINUTES            COOK TIME: 40 MINUTES

Ingredients:

¼ cup cooking fat of choice

1 ½ cups unsweetened shredded coconut

2 tablespoons coconut flour

1 tablespoon Trifecta Spice Blend (page 330) and for sale here

2 teaspoons paprika

2 large eggs

2 pounds chicken tenders (see notes)

Prepared yellow mustard, for serving

Method:

  1. Preheat the oven to 375°F. Line a rimmed baking sheet with foil, then place a wire baking rack on top of it and set aside.
  2. Place a large, heavy-bottomed saute pan over medium-high heat. Using just enough fat to coat the bottom of the pan, melt the cooking fat and allow it to become hot (but not smoking), about 5 minutes. While the fat is heating up, bread the chicken.
  3. Create a breading station for the chicken: In a large shallow bowl or dish, whisk the coconut, coconut flour and spices until well combines. In a second large shallow bowl or dish, whisk the eggs until well beaten.
  4. Dip a piece of chicken into the egg to coat it completely, allowing the excess egg to drip off. Next, dredge the chicken in the flour mixture to coat it completely, gently shaking off any excess. Repeat this process for all the tenders.
  5. working in batches, place the chicken tenders in the hot pan and cook for 3 to 4 minutes on each side, until the breading has turned golden brow, adding more cooking fat to the pan as needed. Transfer the browned tenders to the wire rack on the baking sheet and space them out evenly.
  6. One all of the chicken has been browned, place the baking sheet in the oven and bake for 15 minutes, or until the internal temperature of the chicken reaches 165°F. Serve with mustard on the side.

NOTES:

Nightshade-free? Omit the paprika

If you can’t find precut chicken tenders, you can use boneless, skinless chicken breast sliced into roughly 1 by 4-inch strips.

Sign up for my monthly newsletter! I share even more nutrition advice, recipes you won’t find on the website and special discounts. 


Monday Musings 8.27.18

It finally rained in Spokane and I couldn’t be happier! The air quality has been less than ideal (reaching almost 400 on the index last week) and is now hovering below 70. Rain + forest fires = gooooood.

Other than that though, it’s been a busy week! Lots of work and little play. Though there will be time for play soon. We are headed to Bozeman, MT for a week starting next Tuesday! Should be a very fun trip filled with climbing and friends.

#1 Pumpkin Spice Apple Chips

I am soooo obsessed with pumpkin pie spice lately. I can feel fall in the air and I am ALL IN!

I pulled out my dehydrator and used a mandolin to slice apple slices really thin then simply sprinkled some pumpkin pie spice on and let the dehydrator do its thing! I left it for 48 hours to ensure really crispy chips.

Such a delightful fall treat!

#2 Rhythm Superfoods Carrot Sticks

I am all about the dried foods lately. Rhythm Superfoods just introduced a line of new baked, not fried, dried vegetables.

I kid you not, carrots taste so sweet and like candy when dried! They are perfectly crunchy and just make me so happy to eat. Full of fiber, potassium and beta carotene. They come in Naked, Sea Salt and Ranch flavors.

If you see them at the store, you won’t regret it! Rhythm Superfoods also makes super delicious kale and beet chips!

#3 Against All Grain’s Green Chile Chicken Soup

Seriously WOW! Danielle from Against All Grain seriously knocked it out of the park on this one. While I can’t share her recipe from her book Meals Made Simple I can tell you to go and check it out and make this recipe!!

This soup is good enough to make in the summer. I’ve actually been making it at least once a week for the last few months and LOVE having leftovers to bring to work. Instead of using the suggested slow cooker method, I have tested it in the Instant Pot and can make it from fresh or frozen chicken thighs in 17 minutes!

Plantains, green chilis, chicken thighs, parsnip and jalapeño come together to make such a mouth watering bowl. When it’s done I top it with lime juice and cilantro. So yum!

#4 Iced Rooibos Chai Tea

I love making a big pitcher of tea and keeping in the fridge for on-the-go drinks during the week!

I have been using ~5 tea bags, steeping in hot water for 5 minutes and then refrigerating in a glass container. When I want an iced chai drink I simply take the chai mix concentrate, add coconut milk some stevia and collagen! I either blend or use a hand mixer and then pour over ice.

Much cheaper than ordering out and really easily customize-able!

#5 Acupuncture

This one is a new one I have been experimenting with for back pain. After my car accident in December of last year, I have been experiencing significant lower back pain. Finally after an MRI, I discovered I have a compressed disc along with arthritis.

It gets pretty inflamed and still hasn’t healed so I have been seeking out alternative options to relieve pain. I started a few weeks back and have been waiting to see how the treatments progress.

So far I haven’t had felt any noticeable difference, but I remain optimistic that acupuncture can give me some relief. Being a person that reeeaaallly doesn’t like needles, I have been at least impressed with my ability to control my headgame and tackle this fear.

The needles are very small (10 acupuncture needles can fit in a standard needle head) and you can hardly feel where they go in. Since this type of treatment has been around for a long time, I appreciate the history and consider it a healing art.

One thing I am very appreciative of is the forced relaxation period that comes with my appointment times. Moving with the needles in place is not advised (or really even feasible – believe me, I tried ha!), so I stay very still and try to relax my mind and allow the acupuncture to take its effect.

#6 CBD Topical Cream

You might be wondering what CBD is – CBD stands for Cannabidiol and is the non-psychoactive component to marijuana. The other part (the part that will get you “high”) is THC or Tetrahydrocannabinol.

Applied topically, CBD has amazing potential to lower inflammation and relieve pain. I have been using one with a coconut oil carrier base and it has been working wonders on my back pain.

I do not enjoy smoking marijuana or ingesting it but am perfectly happy to use an ointment with really clean ingredients.

The brand I have been loving is Ceres and they make numerous different products for different ailments. The topical I’ve been using is for deep tissue relief and is called Dragon Balm. It also contains menthol (for a cooling sensation), camphor and mint oil.

Not sure how I would manage this back pain without this product!! Since I am pretty opposed to taking pain meds or steroids at this point. While it is quite easy to purchase in Washington state, laws in other states will likely make purchasing this product quite difficult. Though if you are in a pro-marijuana state I highly recommend giving it a try next time you have some persisting pains!

Chicken Tikka Masala + Instant Pot 101

After taking some time off to recuperate after traveling and living in the van, I am excited to get back to recipe creating, photographing and blogging again! This last week I purchased an Instant Pot and I feel like my life is forever changed in the best possible way!

The Instant Pot is an electric pressure cooker that can also function as a slow cooker, rice cooker, steamer, soup maker and it even has a sauté function! As if that weren’t enough, the Instant Pot has a “keep warm” function that allows you to leave the device on until you’re ready to eat!

Typical slow cooked meals like chili, pot roasts, tikka masala, curries and other tougher cuts of meat are perfect candidates for the Instant Pot. Instead of cooking low and slow for hours, the Instant Pot uses pressure cooking to speed up the cooking process, making many meals in as little as 15 minutes!

The best part about the Instant Pot is that it turns out extremely tender meat in almost no time at all. It really is just a “set it and forget it” kitchen tool! So far I have experimented with making homemade bone broth, steaming beets (in only 10 minutes!), cooking chicken breast, chicken thighs and making this Chicken Tikka Masala. And so far, I have LOVED everything that I have made!

Honestly kicking myself for not getting one sooner! Okay enough with the regret, all that matters is I have one now and I can’t wait to keep experimenting! As far as an introduction to the Instant Pot goes, there are a few points I’d like to touch on before investing in this device.

First is size. There are multiple sizes and functions offered depending on the size of your family of what you will use the Instant Pot for the most. I chose the Lux Mini because I do not cook for a large family or need a ton of extra functions. So far I am very happy with the small size of the Instant Pot and will not likely upsize, but you never know!

Second, while the Instant Pot does have incredibly fast cook times, it does take a bit of time to “come to pressure.” This is the period of time before cooking starts where the Instant Pot weighs the food and must pressurize to a certain level depending on the weight and density of the food. This can take anywhere from 5 – 30 minutes before cooking time starts.

Third, the interface of the Instant Pot is not incredibly user friendly. I would recommend reading the more thorough users manual or head over to this post to get a better understanding of cook times.

Feeling armed and ready with some new knowledge?! Let’s get cooking!

* I would like to point out that this recipe can also be made in a standard slow cooker on low for 6-8 hours following through step 1.

Chicken Tikka Masala

(PALEO, WHOLE30, 21DSD, GRAIN FREE, GLUTEN-FREE, DAIRY-FREE,)
SERVES 4
PREP TIME: 10 MINUTES            COOK TIME: 15 MINUTES

Ingredients:

1½ – 2 lbs. chicken breast, boneless and skinless, cubed

½ can (7 oz.) full-fat coconut milk

1- 14 oz. can tomato purée (no salt added)

2 bay leaves

3 tbs. tapioca starch

3 tbs. water

Spice blend:

1 tbs. curry powder

½ tbs. sea salt

½ tbs. cumin

½ tbs. garlic powder

½ tbs. ginger powder

½ tsp. turmeric

1 tsp. paprika

¼ tsp. cayenne pepper

¼ tsp. cinnamon

¼ tsp. white pepper

½ tsp. five spice powder

1 tsp. garlic, fresh or powder

1 tsp. ginger, fresh or powder

1 tsp. sea salt

optional toppings: cilantro, sriracha, lime, avocado, coconut aminos

Method:

  1. Cube chicken into one inch pieces.
  2. Place chicken, spices, tomato and bag leaves into Instant Pot.
  3. Set to manual, high pressure and set timer to 15 minutes.
  4. After cycle has ended, manually release pressure and wait for pressure to release fully.
  5. Remove bay leaves and stir in coconut milk, tapioca starch and water.
  6. Let thicken for a few minutes and enjoy over rice, cauliflower rice or over more veggies!

Monday Musings 4.16.18

I think we accidentally took our vacation to the rainforest instead of the usually sunny Pacific Northwest. Hopefully all the rain pays off for this summer because it is rally making climbing during our trip very difficult!

We have a lot of downtime. Almost too much downtime… we have found ourselves getting pretty antsy this week to just be outside and climb and enjoy nature like we has planned to. Which brings me to the first musing of the week!

1. Learning to Plan Less

I’m a planner to the core. I love having my days laid out before I start them and am rarely very spontaneous. I like the idea of “sticking with the plan” instead of “winging it.” The last few weeks have been (trying) teaching me to let go of my plans and let go of factors I cannot control.

Factors such as weather, car problems and other unknowns will always happen. I am not able to control when or how they happen but I am able to control my reaction to them and find other things to occupy my time.

Since the weather report hasn’t been exactly accurate we have been trying to be more opportunistic with our climbing sessions and try to find window of climbing time more “in the moment” instead of planning a day or days ahead.

Though my Type A personality doesn’t love this, it is a good lesson in “loosening” that I think my mind an body are appreciating. I get very attached to routines and schedules and they can start to feel restrictive if I don’t take a step back sometimes and reevaluate how and why I do things.

2. Dry Brushing

I’m pretty proud of myself for this one! I have been trying to get myself to dry brush for a few years now and have finally made the time to perform this self-care act!

Dry brushing benefits include removing dead skin, exfoliation, improved blood circulation, lymphatic drainage and can even help reduce cellulite.

I bought my brush at Target, so this is not a sponsored post, and have been incorporating just 5 minutes a day so far for the past week. I have noticed smoother skin already and an overall calm feeling after completing. I absolutely look forward to doing this daily and want to keep this habit up!

3. Magnesium Supplement

If you do not care to read about female menstrual cycle please feel free to skip ahead.

For a lot of women, menstrual symptoms can put lives on pause and require an enormous amount of effort just to “treat” the symptoms that come every month.

Cramps, bloating, mood swings, acne, excessive hunger, low energy and headaches are just some of the symptoms experienced monthly by many women. Largely known as PMS (pre-menstrual symptoms), I have been experimenting lately to reduce my symptoms each month to create a more pleasant and smooth transition into my menstrual cycle.

That being said, I am not of hormonal birth control and have not been for years. I have natural periods that are relatively predictable. While I am happy to have a period and know that my body is healthy enough to potentially support life, I don’t very much enjoy being in pain leading up to an during my period.

Enter: supplements. With a caveat – I eat an almost completely whole foods based diet, very low in refined sugar and free of refined wheat. I have largely identified foods that do not agree with my body and have a decent handle on sugar cravings, I believe that I support my body in being healthy and would suggest a diet change before turning to suppleness to help with PMS.

That being said, let’s talk about Magnesium! Largely touted as a calming and anti-anxiety suppleness, magnesium has been used for years to reduce cramping and promote a calm mind. Since I largely struggle with pretty debilitating cramping, I started doing some research. I found the Period Repair Manual by Lara Briden to be extremely helpful.

Dr. Briden suggests using magnesium prior to and during the menstrual cycle to reduce cramping by reducing the amount of prostaglandins that are released into the uterus. Prostaglandins help the uterus to contract but can cause inflammation and pain.

Ive been using Natural Vitality Natural Calm products for the past month, not daily but at least a few rimes a week and more so during my cycle to reduce my symptoms and am happy to report that I did find some relief! While not totally gone, my symptoms are generally less painful and I am able to function more normally than I have been in the past.

Of course there are many factors that determine the severity of PMS in women like stress, diet, activity level and more, I am pretty happy to have found something natural to help me feel better quicker. See next topic for the food I’ve been loving lately to add iron back into my diet during my time of the month.

4. Love Beets

Beets are high in iron. Ladies need iron during certain times of the month. Enough said on that for now 😉

Seriously loving the convenience of Love Beets packages of steamed beets. I have been eating them plain or tossed in a salad! The pre-cooked beets make #vanlife much easier.

Beets also are a great source of starchy carbohydrates that are low on the glycemic index. This means they are a great source of carbohydrates but won’t spike blood sugar like refined carbohydrates do.

Before we left for our road trip I made an amazing beet soup made with Love Beets and coconut cream. It was so simple and took only 5 minutes. Check out the recipe at the bottom of the post!

5. Vanilla Powder

Ground vanilla beans mean amazing vanilla flavor in everything! I have been using this in my coffee daily and have been adding it to just about everything I think could use a vanilla boost.

It’s amazing in baked goods, smoothies, coffee and on fruit. It’s a little spendy but a bottle seems to last forever! it’s been a great investment so far.

I bought this brand.

6. Watermelon Water

New to me, but oh so delicious! Watermelon water is packed full of potassium and is incredibly hydrating. Potassium is an electrolyte and can help prevent muscle fatigue. I have been loving the brand WTR MLN for my climbing sessions to stay hydrated and love that there is no added sugar!

Watermelon water is also high in lycopene, an amino acid and l-citruline that helps the cardiovascular system and retaining bone density.

7. #vanlife Meals

Here are some of my meals this week! We have been loving trying to get as many veggies in as possible!

Simple Beet Soup

(PALEO, GLUTEN-FREE, DAIRY-FREE, WHOLE30 option, GRAIN FREE, VEGAN)
SERVES 2
PREP TIME: 5 MINUTES            COOK TIME: 5 MINUTES

Ingredients:

2 packages Love Beets pre-cooked Beets

½ c. coconut milk, canned or from a carton

½ tsp. sea salt

Optional ingredients:

Cooked protein like chicken, shredded pork or ground beef

Avocado

Pumpkin seeds

¼ c. collagen protein

Fresh Mint or Dill

Olive Oil

Method:

  1. Place packages of beets in blender and blend until completely smooth.
  2. Using a medium saucepan, heat over medium heat until warmed through.
  3. Add coconut milk to blender to emulsify if from a can (make sure you wash the blender out first!)
  4. Swirl coconut milk into soup and top with desired toppings! I love mine with shredded or cubed chicken, avocado and some olive oil.

Monday Musings 4.9.18 + Easy “Ice Cream” Recipe

Hello from the road! We are still traveling and climbing this week (hopefully for the rest of the month!) and are getting used to life in the van.

This week for my Monday Musings I wanted to share a couple things that I’m way into for this week (and last week oops 🤭).

1. Dulse Flakes

These are seriously the cats meow. Dulse is a form of seaweed that provides iodine in the diet. Since it’s from the sea it has a salty flavor but is technically salt-free. Now, I absolutely love sea salt and adding it to my food but sometimes I wonder if maybe I’m adding too much and these flakes add a fantastic salty flavor without adding more sodium.

Also being high in iodine really helps promote healthy thyroid function. Over 72% of Americans are deficient in this trace mineral. Iodine helps to regulate the metabolic activities of cells and maintain optimal energy levels in individuals.

Some signs you might be deficient include: headaches, menstrual problems, sensitivity to cold, brain fog and impaired thyroid function. The RDA guideline for iodine intake per day is 150 mcg for adults over 14 years of age. Just another reason to love sea salt! It contains iodine naturally (along with 60+ other trace minerals) unlike table salt which has been iodized to add back in nutrients after being stripped and processed.

As always, consult with your doctor before self-administering any supplements.

2. Zevia Ginger Soda

I absolutely LOVE this stevia-sweetened “soda.” It tastes just like conventionally sweetened ginger ale and is so refreshing at the end of the day!

Stevia is a naturally sweet plant that is calorie free and contains no actual sugar. It has been used for thousands of years in places like South America and Japan as a natural sweetener and is about 30-40x sweeter than sugar. A little goes a long way here!

Zevia soda comes in many flavor such as Cola, Lemon-Lime, Root Beer and Orange but my ultimate favorite is the Ginger. Try them for yourself for a healthier alternative to regular soda!

3. Chameleon Cold Brew

This stuff has been a lifesaver on the road so far! We love the Mocha Concentrate and water it down a bit with coconut milk, heat it up and add ghee, vanilla powder and cinnamon for an amazing bulletproof-style coffee drink in the morning!

A full bottle lasts two of us about 4 days and though it is about $10 a bottle it works out to about $1.25 a serving and is way worth the money considering I don’t have to make my own cold brew and deal with the waste and storage space in the van!

I have found Chameleon Cold Brew at Safeway, Fred-Meyers, Whole Foods, Rosauers and almost all natural foods stores. They are based out of Austin, Tx and make an exceptionally smooth product. Highly recommended!

4. Quick One-Pan Dinners

I’ve been having a blast challenging myself to creating healthy meals while we are traveling. We have two coolers and a non-perishable bin for dry goods.

My basic meal template always involves protein + starch (carbohydrate) + veggies. For me, I cook everything in either ghee or olive oil s o I’m not worried as much about adding additional fat to my meals.

Pictures below are some meals I have come up with this week so far. Meals look pretty similar to when we are at home! Though on the road I cook the protein in the pan first and then add the veggies after a few minutes to make sure everything is cooked through with only one burner.

5. Four Sigmatic Reishi Mushroom Mix

I have been LOVING using mushrooms as supplements lately. Along with immunity boosting benefits, mushrooms also have anti-cancer properties and are incredibly anti-inflammatory.

Basically mushrooms are nutritional powerhouses. They contain Vitamins B and D, and minerals like: copper, selenium, potassium and phosphorus.

Different types of mushrooms also can produce significantly different effects on the body. Reishi mushrooms are used to help with anxiety and create calm in the brain. Reishi mushrooms are perfect at nighttime when the brain needs to transition into a more restful state.

Cordyceps are used to help increase stamina and ability and are therefore used as a boost of energy. Lion’s Mane is also used to increase focus, creative and concentration. It’s great to use in the mornings and early afternoons.

That’s just the tip of the iceberg. There are countless more varieties of mushrooms that are great for different purposes. I bought mine from here. The Four Sigmatic website is full of information and brilliant products to support wellness at any stage!

6. Connecting with Nature

From trail running to climbing and camping, it’s been a really nice transitional time period to get more connected to nature and be more intuitive about my decisions and listening to my body.

When I spend more time in nature I can feel myself getting more in touch with my circadian rhythm and am able to sleep better along with going to bed earlier when the sun goes down. I also like being able to eat a bigger variety of foods because I know I am burning off most excess (if any) caloric intake by being active most of the day.

Two- ingredient Banana Ice Cream

(PALEO, GLUTEN-FREE, DAIRY-FREE, WHOLE30 option, GRAIN FREE, VEGAN)
SERVES 2
PREP TIME: 5 MINUTES            COOL TIME: 4 HOURS

Ingredients:

3 ripe bananas, sliced into 1″ coins

½ c. coconut milk, canned or from a carton

Optional ingredients:

1 tbs. cocoa powder

2 tbs. peanut or any nut butter

¼ c. collagen protein or vanilla protein powder of your choice

¼ c. chia seeds

toppings (optional): unsweetened coconut flakes, pumpkin seeds, more chia seeds, gluten-free granola, dried blueberries, dried cranberries, or any chopped nuts.

Method:

  1. Place banana slices in freezer for at least 4 hours or until frozen through.
  2. Once bananas are frozen place in a blender with coconut milk and any additional ingredients you wish to use.
  3. Blend until it reaches a very smooth consistency, you may need to add more coconut milk to achieve a thicker texture
  4. Top with desired toppings and enjoy after a workout, for breakfast or at anytime!

Travel Eats + Van Life (So Far)

Hello from Leavenworth! We decided to take our vacation just a few hours away from our home base and always LOVE coming to this special little Bavarian town.

We have been traveling (and living out of!) our van since this last Saturday and it’s been a journey already! A lot of little bumps and a bit of a learning curve but we are now making everything run pretty smoothly and nourish our bodies well on this trip!

We have avoided eating out almost completely (except for one time where we were offered a free meal in exchange for some work) and have been really happy with how well prepared we are!

Having snacks and quick meals during the day is really important to me as well as being able to make a nutrient dense dinner with some meat and vegetables (and carbs is if was a climbing day!).

In our van we (meaning the fiancé…) have installed solar power panels and a battery that can convert that energy into useable energy for appliances. We are using a butane powered gas stove for our cooking appliance but are able to use solar to power our Nutri-Bullet blender (bulletproof coffee, duh!), coffee grinder, charge our phones, laptops and other small appliances.

It’s really fun to have some modern conveniences in the van like the solar power but we still are doing it pretty “old school” with a conventional cooler and bins for snacks/non-refrigerated items. I figured out pretty early that in order for the cooler to keep food fresh the longest and avoid the dreaded ice melt, water leakage problem that I needed to somehow separate the water from the food.

After some brainstorming I went a bought a metal grill grate to place on top of the bag of ice and then place all the refrigerated goods on top of the grate. This way the ice can melt and the food will not be sitting in water all day. Pretty proud of myself on this one 😉

In terms of refrigerated goods we like to keep certain things on hand that we know we can grab in a rush or in the morning when boiling water for coffee sounds like just a bit too much work. In the mornings we love having Chameleon Cold Brew, coconut milk in aseptic packages, breakfast sausage and pre-cooked bacon. We usually add in some sweet potatoes (cooked up the night before), some greens and maybe some dried fruit.

For grab and go lunches between climbing sessions we love having Applegate lunch meat, cut up raw veggies (carrots, cucumbers, radishes, sugar snap peas), dried fruit like dates, pineapple and mangoes and some form of nut butter.

Dinners look like meals we would cook at home! We’ve had a lot of luck because the grocery store in town carries a lot of pre cut veggies that we can include in our meals if we don’t feel like doing a lot of the prep work ourselves. We’ve had pork chops with butternut squash and Brussels sprouts and chicken thighs with a cabbage mixture and sweet potato spirals.

We generally combine a quicker cooking protein like chicken thighs or breasts, pork chops or ground meat with at least two types of veggies. On longer climbing days we like to include denser carbohydrates like sweet potatoes or rice with dinner so we can recover and refuel for the next day.

Dinner usually takes about 20 minutes start to finish and only uses one pan! I like only having minimal dishes to wash after dinner and one pan meals do the trick! I will try to remember to take pictures of the meals for later reference!

We also always love to have condiments on hand – they make every meal just that much better! Our favorites include Tessemae’s Ketchup, BBQ Sauce and Balsamic Vinaigrette as well as coconut aminos (just like soy sauce but without the soy or wheat!) and sriracha. These fit nicely in the cooler and stay spill proof as long as they are kept upright.

I snapped a quick picture of some of the staples we like to keep in our non-perishable food bin. Zing bars and Rx bars are mainly for the fiancé as I tend to do better keeping nuts at a minimum. I love having jerky bars and meat sticks for a quick protein boost and tuna that I can mix with avocado! Healthy fats and protein = win. We (of course) have dark chocolate for an after dinner treat, dried fruit (pineapple, mangoes and dates are our faves) and a jar of peanut butter hidden deep in there. I also brought some cassava chips for a fun carb-heavier snack and some white rice to include in a dinner stir fry.

I also always bring sweet potatoes (because I basically live off them!), tea bags and plenty of other supplements.

Must-haves for me include collagen, apple cider vinegar, electrolytes, magnesium, melatonin and ghee! I also brought plenty of spices – salt, magic mushroom powder, bagel spice, curry powder, cinnamon and pumpkin pie spice.

So far we’ve really enjoyed our time spent in the van and I’ve really enjoyed the challenge of trying to stay healthy while on the road! I prioritize the fact that food is fuel, eat when I am hungry, don’t worry about calories and try to keep stress at a minimum!

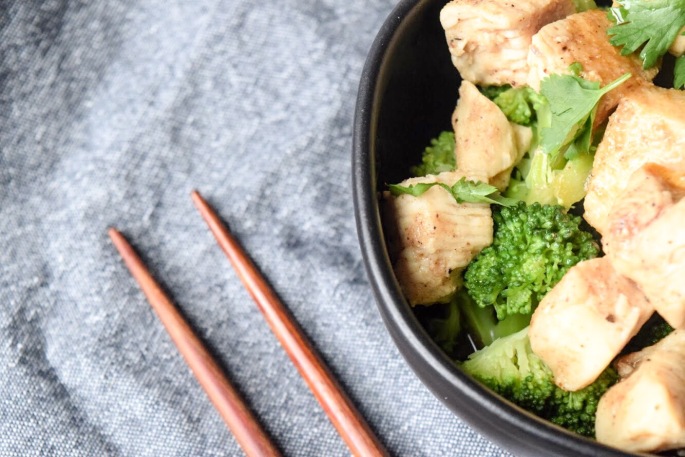
Chinese Five Spice Glazed Chicken (Paleo)

This dish takes under 30 minutes. HUGE WIN for weeknights right? Most all my meals I make take under 30 minutes, actually most take under 10 minutes thanks to the mini meal preps I do throughout the week!

If you haven’t tried Five Spice seasoning yet, get on board! Five spice is a blend of five spices (creative, right?!) including fennel seeds, cinnamon, cloves, star anise, and peppercorn. It has a subtly sweet and spicy flavor and gives depth to meats like you wouldn’t believe!

B5B3F98E-0F1F-4090-BC0E-E29791394E97.JPEG

For this dish I simply steamed some broccoli and served the chicken over it, but you could easily whip up some basmati rice, cauliflower rice or sweet potato noodles! You do you, baby boo.

This dish comes together so quickly that you won’t even miss Chinese take out food. Not to mention you’ll feel great after this dish! Often, restaurants use some undesirable oils (hello canola, vegetable and corn oils) that can leave you feeling icky. Or too much sodium (or MSG) that might leave you feeling bloated and overly full. Thankfully, you can make your own version at home for cheaper and know that you are nourishing your body!

As far as substitutions go, I would recommend sticking pretty closely to what is suggested for the coconut aminos and rice wine vinegar. There is some play room with the honey – you could substitute maple syrup or agave (any liquid sweetener really). For the garlic or ginger, either fresh or powdered versions will work perfectly fine.

You can also play around with the type of meat and swap out the chicken for pork or beef cubes. The world is your little oyster!

IMG_3366

Chinese Five Spice Glazed Chicken 

(PALEO, GRAIN FREE, GLUTEN-FREE, DAIRY-FREE,)
SERVES 4
PREP TIME: 10 MINUTES            COOK TIME: 15 MINUTES

Ingredients:

1½ – 2 lbs. chicken breast, boneless and skinless, cubed

½ tsp. five spice powder

1 tsp. garlic, fresh or powder

1 tsp. ginger, fresh or powder

1 tsp. sea salt

For the glaze:

1½ tbs. ghee, coconut oil or avocado oil

½ c. coconut aminos

2 tsp. ginger, fresh or powder

2 tsp. rice wine vinegar

juice of a lime

optional toppings: cilantro, sriracha, more lime, roasted peanuts, avocado, sesame seeds, etc.

Method:

  1. Heat a large, deep saucepan over medium-high heat and add cubed chicken once hot.
  2. Add salt, five spice powder, ginger and garlic to chicken and stir to combine.
  3. Cover and let cook.
  4. Meanwhile, make the glaze by heating a small saucepan over medium heat
  5. Add all ingredients and bring to a boil.
  6. Once boiling, reduce heat to a simmer and let cook until the chicken has cooked through ~ 10 minutes.
  7. Serve chicken with sauce over your choice of rice or veggies and toppings!